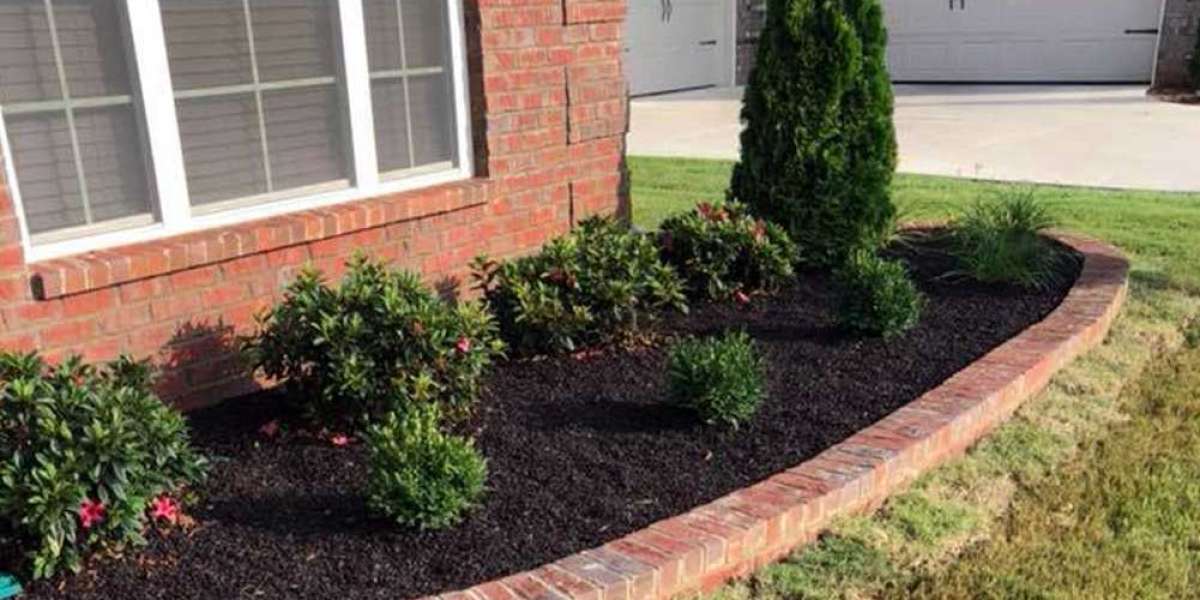
Creating a brick garden border is one of the most beautiful and practical ways to add structure, definition, and elegance to any outdoor space. Even though the project may seem like a very technical and difficult process at first sight, it actually becomes very simple once you understand the sequence of planning, preparing, and building. A garden border made of brick not only improves the appearance of flowers, shrubs, or pathways but also helps in keeping soil and mulch neatly. Protecting the roots of plants from being stepped on, which means that the border is both decorative and functional at the same time.
When preparing for such a project, it is always important to think about every single stage of the process before even touching a single brick.Because proper preparation makes the entire construction smoother and much stronger in the long run. In the early stage of planning, you will need to decide the shape of the border, whether straight lines along a path or curved edges around flower beds.
The layout will guide all the measurements and supply requirements. At this stage, many professional builders recommend performing a detailed material takeoff. It is the process of calculating the exact amount of bricks, sand, gravel, mortar, and other building supplies required to complete the project without waste or shortage. This practice helps in saving money, avoiding extra trips to the store, and keeping the project organised from beginning to end.
Where to Place Your Brick Border?
If you choose the wrong location, then it will likely require rework. For a tidy and neat separation, a brick garden border will work best in flower beds, around vegetable plots, along pathways, on lawns, or around trees. If you want to create a neat and tidy border, it's best to place it in a location that doesn't disrupt the existing root system. Be sure to consider drainage because if you place the border incorrectly, it could result in water accumulating along the perimeter.
Supplies and Tools That You Need
In order to properly build a border for a bricked-in garden, it is essential that the tools and materials are of high quality. It is important to use the appropriate equipment for any project and avoid improvising with inferior alternatives. Following is a complete list.
- Bricks to suit your taste
- The shovel is used to dig the trench.
- The rubber mallet is used to place bricks securely without causing damage.
- Layout curves and straight edges can be marked with a garden hose or string lines
- A wheelbarrow used for moving sand gravel
- For each brick, make sure it is evenly levelled
- A tape measure that is accurate for sizing
- Sand, stone, and mortar mixture
- Mortar trowel
- Safety glasses, gloves, and safety goggles
Oriented Planning
To ensure a smooth finish, stretch a string line tightly between wooden stakes at both ends of the trench. A string should be stretched tight between wooden stakes to prevent bricks from drifting. The garden hose can outline curved patterns that are then traced in the soil later with a spade. The extra time spent on adjusting the design will save you from regretting your poor choice later.
Digging the Trench For the Border
In order to create a brick-bordered garden, you need a deep trench. The trench will keep the bricks in their place over time and prevent them from moving. Dig a six-inch deep trench that is eight inches wide. To ensure a stable border, the depth of the trench should be the same across the whole layout. Inconsistent digging results in unleveled rows. It is important to compact the ground of the trench with a flat-sided shovel or by carefully walking on it.
How to Create the Base Layer
- Bricks that are laid directly onto the soil may become unsteady due to soil expansion and contraction caused by weather.
- It is made up of two different materials: gravel and sand. Start by spreading about two inches (about 60 mm) of gravel on the bottom.
- Tamp this down firmly to make a good drainage layer. Next, level a one-inch layer of sand using a trowel. With the sand, you can easily adjust your bricks while placing them.
First Row of Bricks
Starting at the end of your trench, lay out the bricks and tap them lightly to secure them. Starting at one side of the trench, place the bricks onto the sand and tap lightly with your rubber mallet. With a level, check to see that each brick has the same height as its neighbor from both sides. You can use mortar and spread it thinly between each brick as you progress. This strengthens the connection between them and stops weeds. Make sure that bricks are tightly fitted together when you dry a border.
Building higher or decorative Layers
- According to the look you desire, you can keep your border at one level or build several layers. This will give you a higher and more decorative appearance.
- Always stagger joints when using multiple rows. Bricks from the second level should not be directly above those of the top layer.
- Use mortar between every layer to create a durable structure. For extra style, add decorative elements such as vertical or diagonal bricks at the top.
Filling the Gaps on the Edges
If you want to keep the border from shifting after the bricks, make sure that all edges are secured properly. To create a border that is dry laid, you will need to pour sand and then sweep it in with a bristle broom. You can spray sand lightly into the joint with water. To create a border with mortar, simply fill up the joints in mortar with a trowel and then use it to smooth out any rough edges. Also, backfilling with soil along the trench's edges will lock in bricks.
Maintenance
If the border has been built well, it requires little to no maintenance. However, checking on it every few years will help ensure its longevity. Find any missing or loose bricks. Clean away weeds trying to grow between the joints and add new sand or cement if required. By using water and brushing the brick surface, you can keep it clean and avoid moss growth.
Benefits
There are many advantages to building a brick fence around your garden. By defining edges and keeping soil and mulch in check, it makes lawn-mowing simpler, enhances a garden's value, and can last for years. Bricks offer a lot of creativity as you can design straight, curvy, and even geometric border lines depending on the personal taste.
Conclusion
Build a brick wall border to enhance any garden. This project will transform your outdoor space and make it more functional, organized, and elegant. The layout of the garden, the accurate estimation of the materials needed, the digging and preparation of the trenches, the creation and maintenance of the finished brick border will result in a stunning and functional area.
FAQs
How Deep Do You Dig The Trench To Border A Brick Garden?
The depth of the trench is usually six to eight inches. This can change depending on how big and what type of brick it contains.
Is Sand The Right Type For Brick Laying?
Because it is compacted well, and gives the bricks more stability, sharp sand works best.
How Long Do Brick Borders Last On The Garden?
The brick garden border will last a long time with the right installation.